Processing...
Imagine transforming your lawn into a personal paradise that requires minimal upkeep and stays green year-round. Artificial grass revolutionizes outdoor spaces with its resilience and low maintenance. As we step into the heart of this trend, let’s explore its many benefits and what makes it a fitting choice for homeowners seeking both beauty and practicality.
Installing artificial grass involves more than just the dream of a perfect lawn; it’s about thorough preparation and the right approach. From evaluating the intended area’s base and drainage to selecting the necessary tools and calculating the required materials, meticulous planning sets the groundwork for a successful transformation.
Let’s review the the step-by-step process that allows you to to lay down a lush carpet of synthetic grass, from removing the old, lifeless turf to securing and seaming the new, premium grass blades.
Artificial grass, also known as synthetic turf, offers homeowners a lush, green lawn without the high maintenance of real grass. Of the many benefits of artificial grass is that it stands out as an economic solution that drastically cuts down on ongoing lawn care expenses. The installation of an artificial grass lawn eliminates the need for water-sapping upkeep, reducing monthly water bills and conserving vital resources.
Key Advantages:
The resilience of fake grass to foot traffic and its ability to stay immaculate even in adverse weather conditions makes it an ideal option for busy homeowners. With artificial turf, families gain more time to enjoy their outdoor space while contributing to environmental conservation.
Before starting into the artificial grass installation, careful planning, and preparation are key to ensuring that your artificial grass lawn looks great and lasts long. First, understand that laying artificial grass directly on top of natural grass is not advised due to the potential for an uneven surface and issues with weed growth. To adequately prepare the area, we remove the existing grass to a depth of up to 4 inches. This step will allows us to create a solid base for the artificial turf to rest on.
Once the area is cleared, it’s important to lay a weed barrier. This addition hinders unwanted vegetation from penetrating your new turf. With the barrier in place, you can proceed to level off the surface. Use sharp sand to create a well-drained and level surface, which is essential for the aesthetic and functionality of your finished lawn.
Keep in mind that the success of your artificial grass lawn is directly related to the quality of the installation. Fontaine provides well-prepared base to ensure better aesthetics, increased durability, and extend the longevity of your investment. Our expertise can help you avoid common pitfalls and result in an artificial grass lawn that not only looks professional but also stands the test of time.
The base on which your artificial grass will rest is the foundation of a successful installation. If considering an installation on a pre-existing lawn, ensure that the surface is in good condition and properly leveled. An uneven base can lead to a bumpy and less aesthetically pleasing final product.
Drainage is another crucial aspect of installation. Even though artificial grass has excellent drainage capabilities, you must enable it to function correctly. To prevent water accumulation, consider adding a layer of fine crushed stone or sand beneath the turf. This enhances drainage and prevents the lawn from becoming a swampy mess during heavy rains.
The right tools and materials are critical for a smooth installation of your artificial grass lawn. When gathering materials, consult with your synthetic turf’s manufacturer for their specific recommendations. You’ll need the actual turf, base materials such as road base and clear crush for drainage, seam tape, glue, and galvanized spiral turf spikes to secure the turf. Additionally, bagged infill like washed silica sand, black crumb rubber, or copper slag may be required depending on your chosen turf’s specifications.
Ensuring adequate preparation and having the correct tools and materials at hand will make the difference between a professional-looking lawn and a potential DIY disaster.
A precise measurement of the area where your new artificial turf will be installed is pivotal. Calculate the width and length of the turf strips to ensure they adequately cover the intended spot. To avoid disturbing your carefully prepared smooth base, extend each strip of turf with a partner’s assistance.
As you lay out your turf, make sure all of the grass blades are pointing in the same direction to achieve that seamless, natural lawn look. Dragging the rolls of turf across the base can create inconsistencies; instead, gently place them down and adjust as needed.
In creating a table or a list for this area, include the following:
This organized approach will not only help you envisage your layout but also ensure you purchase enough materials for the job without unnecessary surplus.
Transitioning from a natural lawn to an artificial green lawn starts with the removal existing grass and weeds. Experts stress the importance of clearing the old lawn completely to ensure the longevity and aesthetic appeal of your synthetic turf. Neglecting this step may lead to problems such as improper drainage and unwanted vegetation popping up.
Proper ground preparation is an important step in the process of installing an artificial lawn. To begin, one must remove any natural grass or vegetation. This involves digging down to a depth of about 4 inches, a process that creates a recess to accommodate the base layer and prevents future complications with weed growth or surface unevenness. Clearing the existing lawn also helps in managing the issue of weed barrier penetration by eliminating any natural grass that could compromise the synthetic turf.
It’s crucial to ensure that the base surface is thoroughly cleared of any stones, roots, roots, and debris. Smooth out the surface utilizing tools like a landscape rake, and proceed by compacting the ground with a compactor or plate tamper to achieve a flat and stable surface. Proper clearing and preparation of the ground, including the use of drainage-promoting materials such as sand or crushed stone, enable your new artificial lawn to adequately handle foot traffic and inclement weather.
After clearing the existing lawn and preparing the ground, it’s time to install the base and sand layer that will support your artificial grass. Begin by evenly spreading builders sand across the area, aiming for a uniform depth that will create a level base. This foundation is integral for both support and drainage, preventing pools of water from forming on your artificial turf after heavy rainfall.
To ensure the longevity and performance of your artificial lawn, it is critical to construct a solid base. Start by spreading builders sand on the cleared area to a depth that ensures evenness across the lawn. Carefully compact a layer of sand using a tamper or, in a DIY scenario, a piece of plywood and a rubber hammer. This step removes air pockets and provides a sturdy foundation on which the artificial turf will lie.
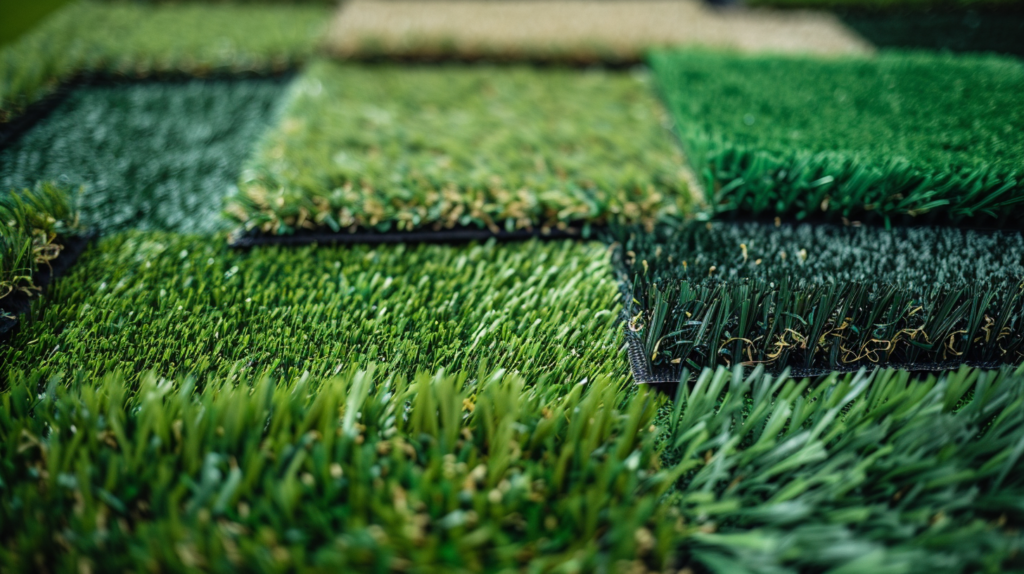
Once the sand is evenly distributed and compacted, roll out a weed barrier cloth over the area. This will impede any potential weed growth through the artificial grass. Secure the weed barrier with landscaping staples every three to four feet to ensure it stays in place. It’s also advisable to consider the type of synthetic turf that will best meet your needs in terms of use, appearance, and longevity.
Next, enhance the base with an additional layer of sand. This layer, about 1-½ inches deep, must be spread out evenly. Once laid down, you’ll need to compact it again. This not only reinforces the solidity of the surface but also fine-tunes the leveling. The goal is to have a firm, level surface that can facilitate proper drainage.
After the sand base is firm and level, it’s you should lay down a weed barrier on top, reducing the likelihood of any vegetation sprouting up through your new grass. Once the barrier is in place, you may add an extra inch of leveling sand. Spread it out evenly, ensuring the surface is smooth and graded slightly, ideally at a 2-3% slope away from any structures to encourage drainage.
For those who wish to define the borders of their artificial lawn explicitly, this is also the perfect time to install edging materials. Edging can be composed of various materials such as metal, plastic, or wood. It not only defines the space but also provides an anchor to secure the edges of the turf once rolled out.
Rolling out your synthetic turf pieces correctly is what separates a professional-looking artificial lawn from a DIY job. After positioning the grass rolls, it’s important to make sure there are no wrinkles or loose areas. To achieve this, many installers recommend using a carpet stretcher. This tool can pull the turf taut, ensuring a smooth surface that’s ready for seaming.
Once stretched out, it’s time to join together your turf strips. Laying a strip of seaming tape or robust outdoor tape on the level base, precisely underneath where the turf edges meet, will facilitate this process. Place the edges of the two synthetic turf pieces together above the tape and apply appropriate pressure to secure them.
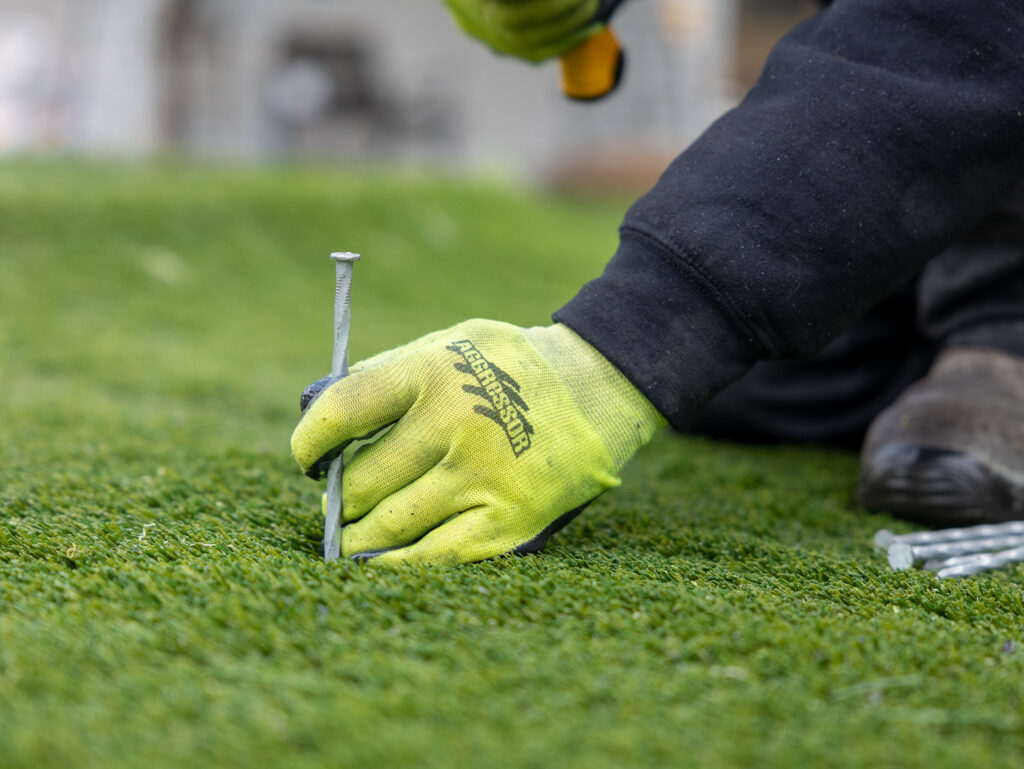
Trimming must be done with precision for a sharp look. Using a sharp knife, cut the edges of the artificial grass, leaving about 1/4 to 1/2 inch of surplus turf for the finishing touches. This extra turf will be vital in achieving a complete, refined edge. Secure the perimeter of your newly laid out lawn with nylon spikes at intervals of every six inches to prevent any movement.
The beauty of your artificial grass lawn dependent on how well the turf pieces are positioned and seamed. When laying out each section of the turf, be extra careful to align the blades in the same direction. This alignment is key for a seamless, lush green lawn appearance.
When cutting the edges for installation, giving yourself a bit of extra turf, slightly longer than needed, will serve you well. This extra length provides leeway for tucking the edges under borders or against walkways, giving a clean and professional final appearance.
And speaking of edges, allow a few extra inches along the perimeter of the installation area. These additional inches are your friends, providing room to maneuver and tuck the turf for those precise, clean edge finishes around borders, resulting in a neatly manicured artificial lawn.
In the assembly of your artificial grass, the proper application of seaming tape and adhesive is what holds your work together. Sealing seams should be done attentively to prevent bunching or gaps. Traditional tools like landscape anchors or specially designed 6-inch galvanized nails can be used to keep the turf is held firmly to the ground. Make sure the seaming tape and glue are applied and set under the suitable conditions recommended by the manufacturer to secure that perfect seam.
The final step of your installation involves trimming and shaping the artificial grass to fit the unique contours of your chosen area. Careful trimming around the perimeter is essential for a neat installation, leaving a tailored border that contributes to the overall look of your lawn.
A carpet kicker can be a handy tool during this stage. It helps to stretch the artificial turf into place and hold it while you trim. For the best finish, leave a margin of a quarter to half an inch of turf beyond the border. This slight overhang can be tucked for a polished edge.
Where the seams of different turf pieces meet, ensure they are firmly secured with seam tape and adhesive. This step is non-negotiable for a consistent and uninterrupted flow of the grass blades across the entire lawn. And remember, keep the direction of the turf blades coherent – this subtle consideration adds an extra layer of professionalism to your work.
With these steps, your artificial grass lawn will not only look splendid but will also be a durable surface suitable for varied foot traffic and outdoor activities.
The installation process of your artificial grass isn’t complete without adding infill. This crucial step involves spreading infill material, such as sand or coated crumb rubber, across the turf. The right infill plays a pivotal role in maintaining the stability and resilience of your synthetic lawn, giving it an authentic look and feel.
After laying down the synthetic turf and securing it in place, the final step is to distribute the infill evenly across the entire surface. Using a drop spreader guarantees consistent and even coverage, crucial for the artificial grass’s performance and longevity. This method also helps avoid excessive buildup in any area, which can affect the way the grass looks and feels underfoot.
Once the infill material is applied, a thorough brushing with a power or push broom is necessary to lift the grass blades and work the granules down to the base of the turf. This step not only aids in giving the artificial lawn a lush, natural appearance but also assists in regulating temperature, providing cushioning, and enhancing the stability of the turf against foot traffic and other outdoor activities.
It is important to choose the right infill material for your artificial lawn’s specific needs and desired functionality. Traditional infill materials such as crumb rubber, while providing resilience and stability, may also harbor unpleasant odors and potentially harmful chemicals. This has led to a demand for safer and more environmentally friendly alternatives.
To avoid such issues, consider incorporating acrylic coated sand, silica sand, or green-sand alternatives. These options are not only safer but can also include beneficial properties such as odor reduction and enhanced durability—crucial characteristics for areas frequented by children and pets.
Upon choosing the suitable infill for your needs, the next critical step involves evenly spreading it across the artificial turf. Employing a drop spreader is the most effective way to achieve uniform distribution, ensuring your artificial lawn retains a natural look and optimal performance.
After dispersing the infill, use a stiff-bristle broom or a landscape rake to delicately brush the sand into the turf fibers. This supports the grass blades to stand upright, creating a realistic and inviting lawn. It’s beneficial to work in the direction of the turf blades to maintain a uniform aesthetic and minimize visible seams.
This step isn’t simply cosmetic; a well-distributed infill provides substance and support. It enhances the lawn’s resilience to foot traffic, offering a surface that’s not only visually appealing but also designed to endure the comings and goings of daily life. By following this procedure, homeowners are rewarded with an artificial grass installation that mirrors the beauty of real grass while boasting superior durability and longevity.
Artificial grass maintenance lawn is relatively simple, but it requires regular attention to ensure it maintains its inviting appearance and durability. A routine care regimen will help your artificial grass stand up to the elements and continue to look its best for years to come.

Artificial grass may look effortlessly perfect, but it does need regular grooming to stay that way. Focus on areas with high foot traffic, as these are prone to matting. Using a stiff brush or a specialized artificial grass rake, brush against the grain of the grass blades to lift them and keep them standing upright.
Cross-brushing is also beneficial – by varying the direction of your brushing, you can fluff up the fibers and prevent them from leaning too far in one direction. Regular brushing will help maintain the lush, natural appearance of your artificial grass and will prolong its lifespan by minimizing matting and ensuring even wear.
Proper drainage is paramount when it comes to artificial turf. If your turf is installed over a concrete surface, it’s essential to have a suitable turf underlay to facilitate drainage and prevent odors, particularly for pet owners. The base layer is crucial in allowing water to flow through, which is especially important given that artificial turf lacks the natural drainage system of real grass.
Cleaning up spills as soon as they occur is the best way to avoid permanent stains. For stubborn spots, a mix of mild detergent and warm water usually does the trick. Rinse away suds with a garden hose using clean, cold water.
To tackle urine odors, especially from pets, baking soda is a handy household remedy. Sprinkle it over the affected area, let it sit for about 20 minutes, then rinse it off with warm water.
By adhering to these care and maintenance tips, homeowners can enjoy a beautiful, green lawn that withstands the test of time, all with minimal effort when compared to natural grass.
At Fontaine Landscaping, we are dedicated to helping you create and maintain a beautiful, low-maintenance outdoor space with our high-quality artificial grass solutions. Whether you seek a lush, green lawn year-round or a safe, mud-free play area for your children and pets, our expert team is here to ensure a seamless installation and lasting satisfaction. With our comprehensive planning, meticulous preparation, and professional installation services, you can enjoy the aesthetic appeal and practical benefits of artificial grass without the hassle of traditional lawn care. Transform your yard into an oasis of beauty and convenience with Fontaine Landscaping. Contact us today to start your journey towards a greener, more sustainable future.
Artificial grass offers numerous benefits, including low maintenance, cost savings, and year-round aesthetic appeal. It conserves water, eliminates the need for harmful pesticides and fertilizers, and withstands heavy foot traffic and adverse weather conditions.
The duration of the installation process varies based on the size and complexity of the area. On average, a professional installation can take anywhere from a few days to a week, including site preparation, base installation, laying the turf, and final adjustments.
Artificial grass requires minimal maintenance compared to natural grass. This includes regular brushing to keep the grass blades upright, cleaning to remove debris and spills, infill management to maintain appearance and functionality, and occasional weed control.
The base preparation for artificial grass involves removing existing grass and topsoil to a depth of about 4 inches. A weed barrier is then installed, followed by creating a level base with sharp sand or crushed stone, and compacting the base to ensure stability.
Yes, artificial grass is safe for both children and pets. It provides a clean, mud-free play area that is durable and free from harmful chemicals used in traditional lawn care.